

One of the first questions when learning Ash: where should you put side effects?
Resources and actions are declarative and clean… until you need to make that dirty, long-running API call. Where does it go?
This post breaks down the Ash action lifecycle so you can confidently place external service calls at the right point. We'll cover the simple tools Ash provides to control exactly when your code runs.
The problem
When building an Ash application, it's tempting to use before_action hooks for all pre-processing needs. The name suggests it runs before the action happens, so that's where you'd make an API call, send an email, or perform other side effects, right?
Not quite. This is where developers often go wrong. It's actually a mistake that leads to subtle bugs and degraded performance.
Claude also gets this wrong frequently, so it's an important thing to check carefully when generating Ash Resources.
The transaction boundary matters
The thing to be aware of, which can trip people up is transaction boundaries. When you run a create, update, or destroy action in Ash, the framework automatically wraps your operation in a database transaction. This transaction starts before before_action runs and commits (or rolls back) after after_action completes.
Here's what that means in practice:
defmodule MyApp.Accounts.User do
  use Ash.Resource

  actions do
    create :create do
      accept [:email, :name]

      # This runs INSIDE the database transaction
      change before_action(fn changeset, _context ->
        # Making a network request here is problematic
        case ThirdPartyAPI.validate_email(changeset.attributes.email) do
          {:ok, _} -> changeset
          {:error, reason} -> Ash.Changeset.add_error(changeset, reason)
        end
      end)
    end
  end
end
Why is this a bad thing?
When you make a network request inside a database transaction, you're holding open a database connection whilst waiting for that external service to respond. This creates several problems:
Connection pool exhaustion: Database connections are a limited resource. If your external API is slow or times out, you're holding that connection hostage when it could be serving other requests.
Deadlock potential: Long-running transactions increase the likelihood of database deadlocks, especially if other operations are trying to access the same records.
Inconsistent state: Your API call succeeds, then the transaction rolls back. Now the external service thinks the user exists but your database doesn't.
Performance degradation: External API calls can take hundreds of milliseconds or even seconds. Holding a transaction open for that long directly impacts your application's throughput.
The lifecycle in detail
The lifecycle divides into three distinct phases:
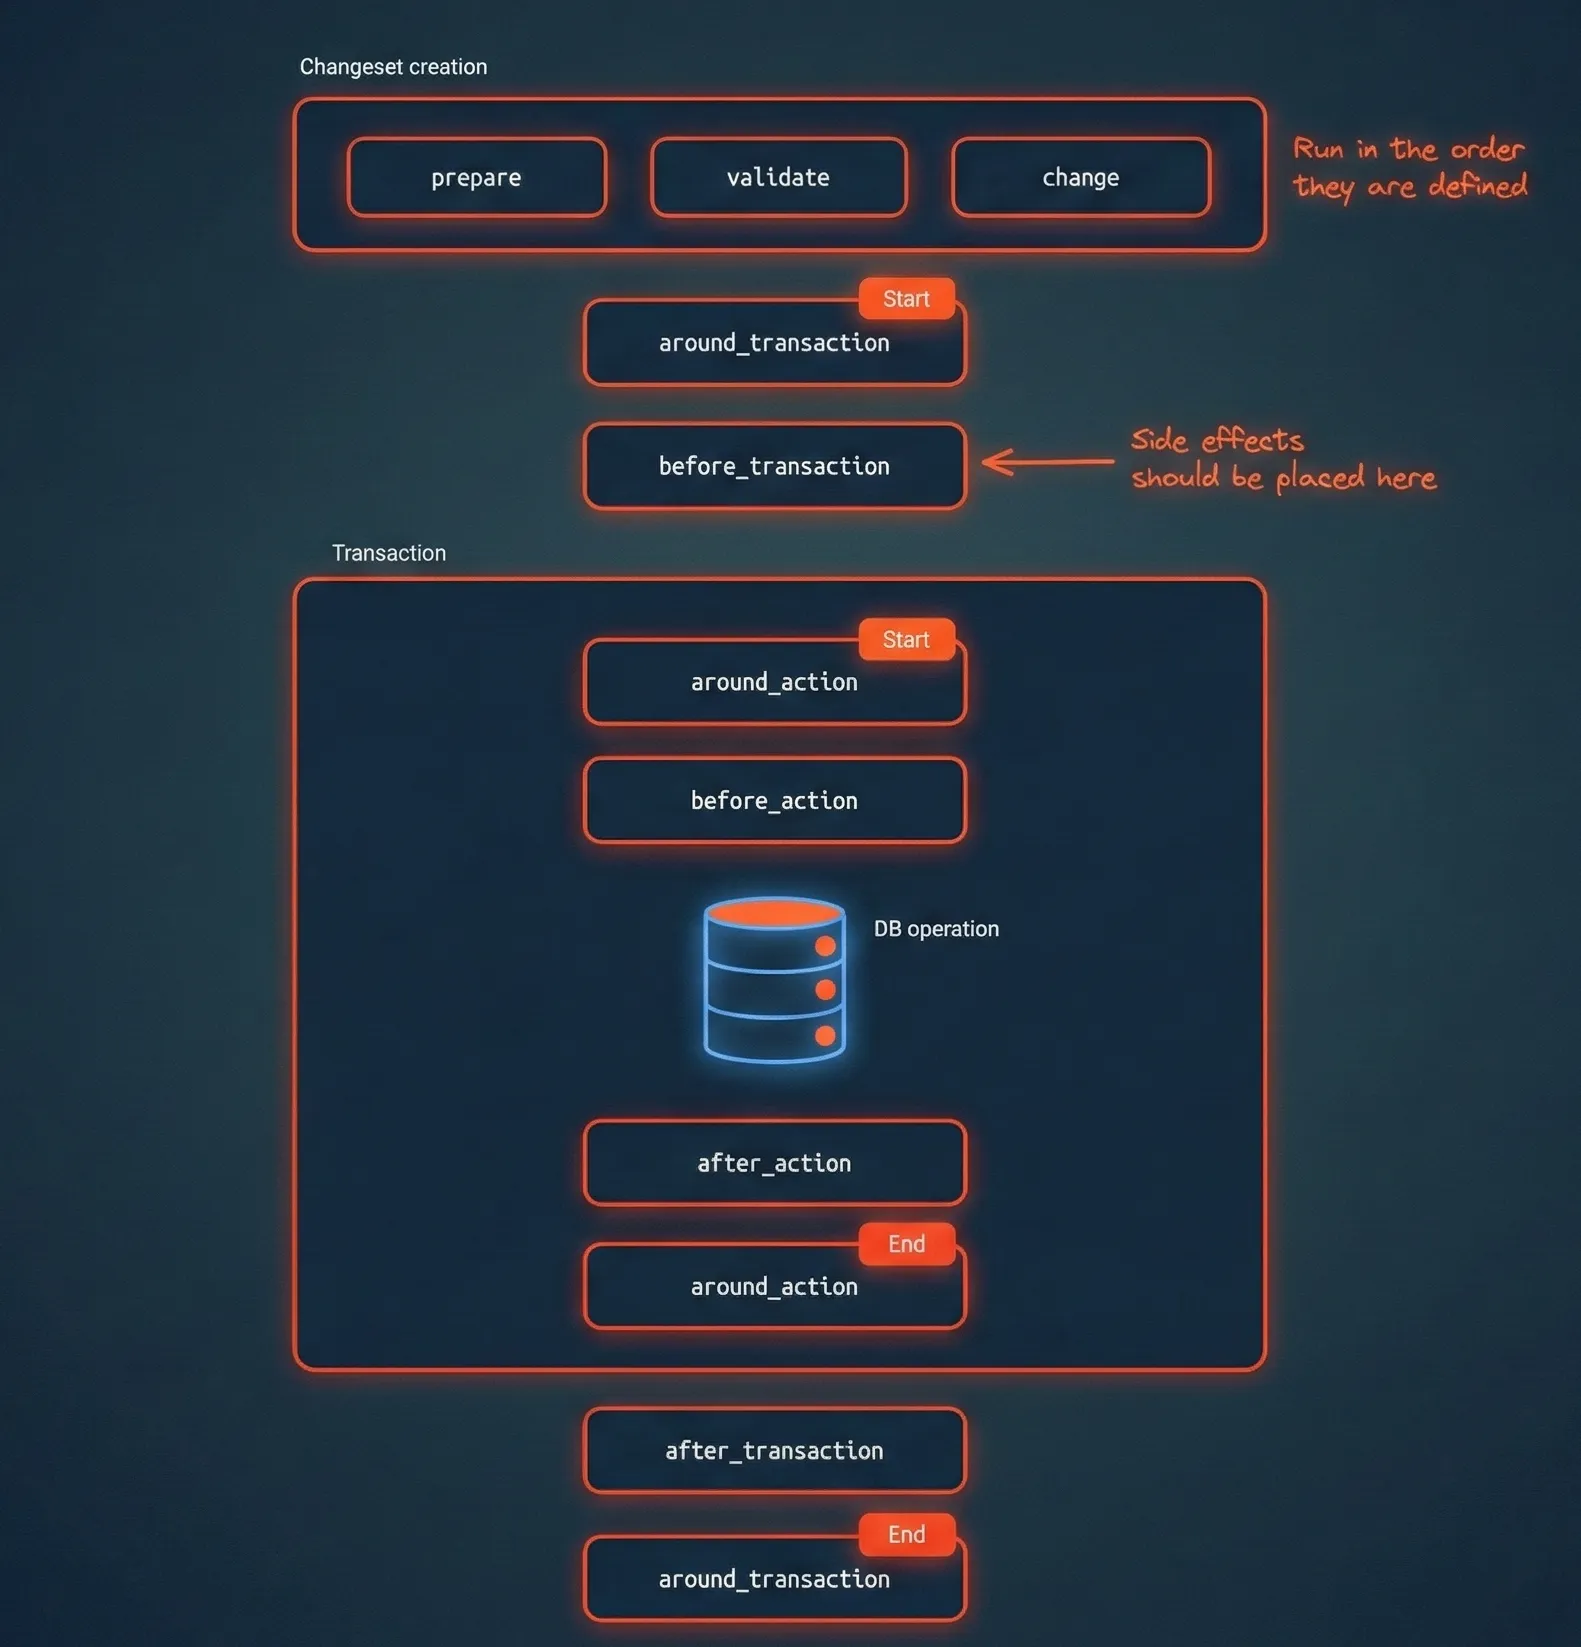
The diagram above illustrates the complete flow from changeset creation through to the final transaction cleanup. Notice the clear boundaries: changeset creation and before_transaction sit outside the transaction block, whilst before_action, the database operation, and after_action all occur within the transactional boundary.
Pre-transaction phase
This phase occurs before any database transaction begins. It includes:
- Action preparations, validations, and changes: These run during changeset creation in the order you define them. Despite their names suggesting they're grouped by type, they actually execute sequentially as specified in your action.
around_transaction(start): The opening phase of the transaction wrapper, useful for setting up resources or logging.before_transaction: This is where you want to place operations that need to happen before the database transaction starts—external API calls, file system operations, cache warming, and other non-transactional work.
Transaction phase
Once the database transaction begins, you're inside the critical path:
around_action(start): Wraps the actual database operation, useful for performance monitoring and debugging.before_action: The last chance to modify your changeset before it hits the database. Use this for final data transformations and transactional side effects like audit logging.- Data layer operation: The actual database interaction (INSERT, UPDATE, DELETE, or SELECT).
after_action: Runs only on successful operations, still within the transaction. Perfect for transactional side effects that depend on the operation succeeding.around_action(end): Cleanup phase within the transaction, but only runs if the action succeeds.
Post-transaction phase
After the transaction commits or rolls back:
after_transaction: Always runs, regardless of success or failure. This is your opportunity to perform cleanup, send notifications, invalidate caches, or even implement retry logic.around_transaction(end): Final cleanup of resources allocated during the transaction wrapper.- Notifications: Event broadcasting and webhook calls.
Where to place your side effects
Let's refactor our earlier example:
defmodule MyApp.Accounts.User do
  use Ash.Resource

  actions do
    create :create do
      accept [:email, :name]

      # External API call before transaction
      change before_transaction(fn changeset, _context ->
        case ThirdPartyAPI.validate_email(changeset.attributes.email) do
          {:ok, _} -> changeset
          {:error, reason} -> Ash.Changeset.add_error(changeset, reason)
        end
      end)

      # Database-level operations inside transaction
      change before_action(fn changeset, _context ->
        changeset
        |> Ash.Changeset.change_attribute(:email_verified_at, DateTime.utc_now())
        |> Ash.Changeset.change_attribute(:created_at, DateTime.utc_now())
      end)

      # Post-transaction notification
      change after_transaction(fn changeset, result, _context ->
        case result do
          {:ok, user} ->
            NotificationService.send_welcome_email(user)
            result
          error ->
            error
        end
      end)
    end
  end
end
Moving external API calls to before_transaction solves the connection pool and performance issues, but doesn't fully address the inconsistent state problem. If your before_transaction API call succeeds but the database transaction subsequently fails, the external service still thinks the operation happened.
For simple cases, you could use after_transaction to compensate, as it always runs regardless of success or failure. Then you can check the result and call a cleanup/rollback endpoint on the external service if needed. For more complex orchestration where you need robust rollback semantics, you should consider using Reactor, which provides saga-like compensation patterns.
The around callback pattern
Both around_action and around_transaction let you wrap logic before and after the action by yielding control via a callback. Keep in mind that if the action raises, your post-callback code won't run unless you rescue the exception.
change around_action(fn changeset, callback ->
  start_time = System.monotonic_time()

  result = callback.(changeset)

  # This only runs if the action succeeds
  duration = System.monotonic_time() - start_time
  Logger.info("Action took #{duration}ms")

  result
end)
In contrast, around_transaction completes its post-yield code even if the transaction fails and rolls back:
change around_transaction(fn changeset, callback ->
  Logger.info("Transaction starting")

  result = callback.(changeset)

  # This always runs, regardless of transaction success or failure
  Logger.info("Transaction completed with result: #{inspect(result)}")

  result
end)
Optimising with only_when_valid?
The action lifecycle executes preparations, validations, and changes in the order you define them. This is generally fine, but if you have expensive operations, you might want to skip them when the changeset is already invalid.
Both preparations and validations support the only_when_valid? option:
actions do
  create :create do
    accept [:email, :password, :name]

    # Fast validations first
    validate present(:email)
    validate present(:password)

    # Expensive operation only runs if previous validations passed
    validate validate_password_strength(:password), only_when_valid?: true

    # Expensive external check as the last validation
    prepare fn query, _context ->
      # Complex database query or external API call
      if valid_changeset?(query) do
        # Do expensive work
      end
    end, only_when_valid?: true
  end
end
Here's the docs for implementing that option with preparations and validations.
You'll notice that changes don't have this option. That's because changes have their own lifecycle helpers for ordering: before_action, after_action, before_transaction, and after_transaction. These give you fine-grained control over when your change logic executes relative to the database operation.
Practical example: User registration with confirmation
Here’s a complete example that uses the full lifecycle:
defmodule MyApp.Accounts.User do
  use Ash.Resource

  actions do
    create :register do
      accept [:email, :password, :name]

      # Validate input early
      validate present([:email, :password, :name])
      validate string_length(:password, min: 8), only_when_valid?: true

      # Check email availability before transaction
      change before_transaction(fn changeset, _context ->
        email = Ash.Changeset.get_attribute(changeset, :email)

        case EmailChecker.check_deliverability(email) do
          :ok ->
            changeset
          {:error, reason} ->
            Ash.Changeset.add_error(changeset, field: :email, message: reason)
        end
      end)

      # Hash password inside transaction
      change before_action(fn changeset, _context ->
        password = Ash.Changeset.get_attribute(changeset, :password)
        hashed = Bcrypt.hash_pwd_salt(password)

        changeset
        |> Ash.Changeset.change_attribute(:hashed_password, hashed)
        |> Ash.Changeset.change_attribute(:confirmation_token, generate_token())
        |> Ash.Changeset.change_attribute(:confirmation_sent_at, DateTime.utc_now())
      end)

      # Send confirmation email after transaction commits
      change after_transaction(fn _changeset, result, _context ->
        case result do
          {:ok, user} ->
            Task.start(fn ->
              Mailer.send_confirmation_email(user)
            end)
            result
          error ->
            error
        end
      end)
    end
  end
end
This example demonstrates the proper separation of concerns:
- Fast validations run early to fail quickly
- External email validation happens before we start a transaction
- Password hashing and token generation occur inside the transaction
- Email sending happens after the transaction commits, in a separate process
Key takeaways
Understanding the Ash action lifecycle prevents subtle bugs and improves your application's performance. Remember these principles:
- External API calls and network requests belong in
before_transactionorafter_transaction, never inside the transaction - Use
before_actionfor final data transformations that need transactional guarantees - Use
after_actionfor operations that should only run on success and need to be part of the transaction - Use
after_transactionfor side effects like sending emails, invalidating caches, or calling webhooks - Leverage
only_when_valid?to skip expensive operations when validation has already failed - Remember that
around_action's cleanup phase won't run on failures
Getting your hooks in the right place isn't just about following best practices—it's about building reliable, performant systems that handle errors gracefully and scale under load. The Ash framework gives you powerful tools to structure your code properly; understanding the lifecycle ensures you use them effectively.
References
The Ash docs cover this well. Here are the relevant functions in lifecycle order:
Now go put your side effects in the right place.